Saturday, April 4, 2015

Sew Savvy Workshop At Learning Oasis


I have been busy working with a group of teenagers last week (30 March 2015-3 April 2015) in a sewing workshop I dubbed "Sew Savvy Workshop". The theme of the workshop is "upcycle" where they upcycle old denim into something usable. 

There was a total of 11 participants for the workshop and I put together a sewing kit pouch for each of them to get them started.


The first day of the class, they get to explore the sewing machine hands on and did a series of practise sheets on paper. I am glad to report that they found it interesting and fun finding their way around the machine.

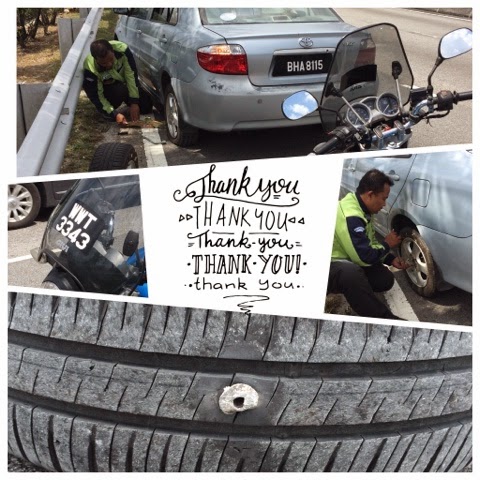
Day 2 of the workshop, I had a flat tyre episode on a 3 lane highway. It was very scary to be stuck by the roadside with cars zooming past you while waiting for help to come. Alhamdulillah, a highway patrol rider came and help me change the tyre. Thank you Encik Yusuf for the assistance. May Allah give you ease in your daily affairs.


Day 3 and 4 went like a blur because the participants has already started on their project. We had penny board bag project, drawstring backpack, owlie purse and sunglasses pouch going on all at the same time. 

Oh, there were boys too in the workshop and they can actually handle the machine quite well as some of them are currently taking driving lessons. Controlling the speed of the machine with the food pedal was easy for them and they can stitch up pretty decent straight lines on the practise sheet.

As we wind down for the last day of the workshop, I managed to take a few selfies with some of them and their finished work. 


I love every moment working with this wonderful group of youngsters. I learned a lot from them and enjoy seeing the light  in their eyes as we put together their project and see how everything falls together. The icing on the cake was they immediately wear the bags that they made.

The 5 day journey has come to a great end but it's not the end. It's just a beginning as the principal of the centre is keen to have the sewing workshop as a once a week after school project following a favorable response from the participants. Alhamdulillah. That would keep me busy and help fill my umrah funds, InsyaAllah. 

Saturday, March 21, 2015

Mug Caddy


I don't know about you but my mug collection has somehow expanded over the years and I have more than I need. So I thought I'd upcycle them for Teacher's Appreciation gifts. While browsing Pinterest for ideas, I stumbled upon this cute mug caddy idea and fell in love with it.

I looked up for free tutorial online and put two and two together and came out with my own version. It's a quick project and you can whip one up in under an hour. i made two!


It's so fun to make so I put together with another quick project as a beginner's project to learn. I haven't blog about me teaching sewing at Spotlight Ampang Point since last October. That will be in another post. Back to my story; if you would like to learn to make this cute mug caddy plus a quilt as you go option of a purse or a hotpad, book a class with me. Details are on the poster below:


I have students coming from outside Klang Valley and I am humbled by their enthusiam to learn and willingness to travel the distance. Not many are aware that I do private classes too. If you can gather a group of friends together, I charge a nominal travelling fee to come and conduct the class at your convenience. Just drop me a line to discuss your requirements with me.

Wednesday, March 18, 2015

Silhouette: Monogrammed Multi Purpose Zippered Pouch

A friend invited me for a kenduri kesyukuran for her daughter who did well for her UPSR recently. She has been accepted to MRSM Ulul Albab Gemenceh. I whipped up a simple zippered pouch. It looked plain despite the rainbow coloured dots motive and I was in the mood to play around with my Silhouette Potrait.


I didn't want to make it too complicated so I decided to add a monogram on the pouch.

This was my 2nd attempt to cut fabric on Silhouette and the first with PixScan mat. Unfortunately, it didn't go as easy when I used the original mat. Maybe the mat was stickier compared to PixScan mat because my fabric moved. I had to repeat the process 4 times before I got it right. So, for my future reference and to benefit other Silhouette users, here is my how tos:


1. Prepare the fabric. I sprayed the scrap with starch spray and iron it until it is relatively stiff. Then I lightly sprayed some adhesive on the wrong side of the fabroc so it sticks to the mat. Then i secure the edges with masking tape.
2. I then took a picture of the mat and imported it into Studio.
3. I typed the letter M and fitted it within the scrap.
4. Once I am happy with the font, I sent it for cutting.
5. The cut out letter M after I removed the excess fabric.
6. The monogram.


Initially, I glued the letter M onto the pouch with fabric glue but it needed some dimension to it. So I finished the monogram by hand stitching around the edge with blanket stitch using a contrasting embroidery thread colour. i like the finished look, don't you?


Saturday, March 14, 2015

Silhouette: Experimenting with PixScan Mat & Vinyl Starter Kit

This is me when I get a new toy; I would browse the internet and Pinterest on projects using Silhouette and my head just started to spin with so many things to do. I gave in and bought 2 additional items to add into my Silhouette collection; the PixScan mat and Vinyl Starter Kit. I ordered them here on Tuesday, 10 March 2015 and they arrived the next day. That’s what I like about Online Shopping.


I tested the PixScan Mat first. It was fairly easy to calibrate my Iphone to the software. I have some pattern paper with some designs that I can immediately use to cut out so I took a picture of it on my iphone, transfered the image to the software and send it to cut. Easy peasy huh? NOT! Well, not after several attempts. The trick is: TAKE THE PICTURE IN A WELL LIT AREA WITH AS LITTLE SHADOW AS POSSIBLE AND TO TAKE A PICTURE OF THE WHOLE MAT.
There’s several videos on YouTube teaching you how to calibrate the camera to cutting the scanned image. Here’s my demo of my PixScan test:


Then I tested the vinyl. I know Teacher’s Appreciation Day is somewhere in May. With two kids in school, there’s no harm in starting early on the gifts. Again, with things around the house (hoarder extraordinaire) I made these coasters from MDF boards bought from Daiso. They came out extremely well. Just love the clean lines Silhouette cut on the vinyl, making the result so professional. (I sprayed 2 coats of clear acrylic sealer over it so that it’s water proof)


Oh, I didn’t just shop for my Silhouette stuff, I had a tough time at home on Monday that I resorted to more online shopping. I had some credit owing to me from an Online Shopping site when I returned a faulty item sometime last year. They gave me some store credit and it was a good time to redeem it (the GST thingy again) So I redeemed it for a huge powerbank. It came on Wednesday afternoon and before I left to pick up Danial from school later that evening, I’ve already pimped it, hahahah!


Having great results from my rather emotional and impulsive purchases, I am glad to report that I have little if not, no ‘Buyer’s Remorse’ hahahahaha

Have a good weekend everybody!

Friday, March 13, 2015

New Item on my Wishlist: Brother V3


While I love my Brother NV900 to bits and made a lot of embroidery work with it, I can't help but yearn for a machine with bigger hoop. Recently, I visited Brother Malaysia HQ in Petaling Jaya and got the change to drool over the V3. It’s priced at RM8,999, just RM1 shy of eight grand!

There’s something working in the pipeline with Brother and I hope I can bring this baby home with me in the near future.

I might want to sell off my NV900. Wonder if anybody is interested... If there’s any interested party out there, drop me a line and name your price, I might sell it to the highest bidder.


Thursday, March 12, 2015

Throwback: New Craft: Wire Jewelry


Picture credit to @rimaumanja’s Instagram

Last year, I took up wire jewelry class with Mastura Mustafa aka Rimaumanja. Seen in the picture above, me in class with Danial photobombing the picture. You can follow Mas on her Instagram at instagram.com/rimaumanja

Mas is an excellent teacher and I fell in love with this new craft. This is what I made in my very first class: 

This is Arwen wearing it as a pendant:

After the first class, I went to beading.my and shopped for my pliers, craft wires and beads. I think I have easily raked up more than a thousand in terms of purchases made there. I have shipment every week and practically chew up the wires. You'll see in a minute what I mean from the gallery below:


I replicate the first pattern I learned and made a hijab pin for myself.


Then, I made more for practise.


Then, I played around with different shapes


I like this stylized kitty cat, don't you?


Then I start selling the hijab pins, to recover my initial investments in materials. Alhamdulillah, they were well received.


I made these too, dubbed "Hearty" which is pronounced "Hati" which is a malay word for "heart" (shish!)

Then Mas went away for holiday in December and left me highly addicted to wire craft. She suggested that I purchase her tutorial on Etsy. Go here to check out her Etsy shop. So, I purchased a whimsical butterfly brooch pattern because I wanted to learn how to make the brooch from wire instead of fixing the finished product to a brooch back. This was my first Butterfly which I made to be lefty friendly: 


and I made some more. All these lovely butterflies have flown to their owners.


I expanded some more on the product range for my wire craft but that will be in another post.

In the meanwhile, if you fancy taking upwire jewelry, you can follow Mas on her Facebook page: https://www.facebook.com/whimsicalnquirky to check out her class schedule. 


Monday, March 9, 2015

New Toy: Silhouette Potrait


I finally took the plunge and bought a Silhouette Portrait. It has been on my Wishlist since last year and I kept putting it off. Since the implementation of GST is due in April, I went ahead with the purchase for fear that the price might increase after the implementation. I got it last Friday, 6 March 2015 and picked it up from the vendor. I ordered it here: Silhouette Malaysia

I only got the chance to unbox it on Sunday which is so unlike me. But I guess people change. I didn’t buy any other kit or tools and managed to use stuff at home to experiment.


This is my first cut with the Silhouette. The Silhouette Studio software looked daunting at first and I was eager to just cut something. So, I chose  a ready design from the 50 pre-installed designs. The mat was extra sticky. I used the normal copy paper and couldn’t peel it off and just ripped it. The second try, I used a thicker craft paper and adjusted the setting somewhat. It came out beautifully and just with one pass. I read some saving tips, to prolong the life of the blade, don’t tick the 2 pass box. 


After the first 2 experiments, I got more confident and searched out for some free patterns. Obviously I know what to look for; Iphone cover template. The picture above, the before image is a manual cut template. the straight lines wasn’t a problem but I didn’t have much patience to cut out the camera hole. I purposely bought a clear Iphone5 cover so that I could change the designs when I get bored with it. Guess what, that Palestine flag design was the only design I made. Fast forward to the present. I found the template here. The after picture is the one i made using pattern paper. The pattern is actually a fabric pattern from Grand Revival’s, Tanya Wheelan. Good thing I’m somewhat of a hoarder (I used to deny it but the fact remains), otherwise, I won’t have anything pretty to cut.


My Iphone didn’t only get one new cover in one day, but two! I experimented with fabric. I mentioned that I didn’t buy any materials or specialty media so I had to work with what I have. I experimented with the tip shared here and successfully cut out a hexy, a circle and the iphone cover template from fabric.

Having said that, I have to confess that I blog less and less these past few years. I guess I’m more into micro-blogging via my pictures on Instagram. They say "a picture is worth a thousand words”. See how easy that is for me to post pictures? If you like the things I make or would like to see more of what I make, do follow me on Instagram here: instagram.com/madebyrozirahman/

With that, I part with one of my favourite quote:
Start where you are; Use what you have; Do what you can

Friday, January 9, 2015

New Year, New Resolution: 52 Week Saving Challenge

Happy New Year 2015!

Gosh! My last post was somewhere in June2014. Seriously, does anybody follow my blog anymore?Blame it on Facebook and Instagram for the sad condition of my blog.

Anyway, I am on a mission to get my life and work/crafting more organised. I’m afraid I’ve been slacking over the past couple of years (OMG!) and let a lot of things slide. My apologies. I have even let this blog go unattended for 6 whole months and missed a lot of comments.

Anyway, in my quest to work on getting things more organised, I turned to Pinterest for inspiration (where else) and I stumbled upon a 52 weeks saving challenge posted in diycozyhome.com. It was an “AHAA!” moment for me and I worked on the 2015 calendar and localised the currency to Malaysian Ringgit.

This is Danial’s 52 week saving challenge based on MYR0.50 increment
The basis is a RM1.00 per week saving with RM1.00 increment every week. Which means, you save RM1.00 in week 1, RM2.00 in week 2, RM3 in week 3 and so on until RM52.00 in week 52. By doing so, at the end of week 52, you would have accumulated RM1,378.00.

I halved the base saving to RM0.50 for my son to get him started on his saving goal. So, at the end of the 52 week, he would have accumulated RM689.00. Not to bad for a start, isn’t it?

If you think that it’s a good idea and wanted to take on the challenge, I’ve included a template for the RM0.50 and RM1.00 increment table for you to print out and stick it onto a container and start the challenge.


The pdf file is here.

Drop me a line in the comment box if you are taking up the challenge and how you are progressing. I hope you can benefit for this little something that I share here. Best of luck for all of us. May 2015 brings us the best that life can offer.

p/s: I’ll work on the 2014 round up and post it in my next post.


Lots of love,

Nuffnang