Sunday, January 29, 2012

A special project for a special new arrival


Erpha passed me this lovely fabric sometime October last year and asked me to make her a diaper bag. I was honored that a skilled seamstress like Erpha trusted me with this pet project. ( Check out her blog here) We bounced emails between each other to get some ideas on what kind of diaper bag she would want to have. I scoured the internet for some inspirations, sent her some photos, asked some questions, she gave her input and I made lots of doodles on my sketch book. 

I have the basic design in my head. The tricky part was to work out the dimensions so that everything falls together. Erpha sent me a 15” zip along with the fabric. 

Then, it took a back seat in my list of projects as I took part in Crafty Art Bazaar in December and needed to prepare some ready made items for stock. In the meanwhile, I spent more time on the drawing board finding the best way to translate the design from drawing board to the sewing machine. 

I knew Erpha is slowing down on her sewing activities in January to prepare for her baby. I made a promise to myself to finish the bag by Chinese New Year and have it sent to her before January ends. Oh, and I resolved to get cracking on it after my first bazaar for 2012 in Berjaya Times Square. Read about it here.I needed to get into the zone, no more excuses.

I finalized my designs during the Chinese New Year public holidays. Prepare the panels and ironed the interfacing, cut and attached the batting to the interrior panels with adhesive spray and what have you.

I just love the fabric. It’s the French Journal collection by Micheal Miller fabric. It’s the motivation I need to see to the completion of this project. I took my time to sew this bag and took great care at putting it together. It’s a real labour of love. I have a reputation to keep. Making a bag to a seamstress with exquisite touch in smocking, I have to make the bag equally exquisite, if not better.  I picture a beaming new mom with her bundle of joy, toting this bag. Proud of her new baby and proud to carry this diaper bag and call it her own. That’s why I dubbed this bag, the ERPHA bag :)

It measures approximately 12”(length) x 13”(height) x 6” (deep) at the bottom with a zippered closure of 15” long. It’s fully padded; 2 bellow pockets on the exterior sides with pearl snaps closures; 2 small bellow pockets on the interior and a bigger bellow pocket with capped snap closure on the opposite side. Check out the pictures below for details.

It’s going to it’s owner next week. Plus, a sweater for Mr. Dodo. From what I heard, Mr. Dodo is not feeling too well and has lost some weight. I just hope the sweater still fit him.

Wednesday, January 18, 2012

Chalk Mat

I received my chalk cloth in the mail yesterday and the kids were curious with what I planned to do with it. I showed Danial a few photos on the internet of some cute chalk mats and he got excited. He even asked me to sew one last night. But I promised that I make one for him and it will be ready by the time he gets home from school today. So this morning, after seeing Danial and Azrai off, I got started on my chalk mat. The first prototype was for Arwen. This is the first time, when she woke up that she stayed next to me and the sewing machine for me to finish the chalk mat. She was so excited that she didn’t take her breakfast and went on and on doodling away on the chalk mat. While she was preoccupied, I managed to make a second one for Danial. 

There’s a lot of tutorials for chalk mats so I’m not going to do one but just show you how mine is different. I like the bias tape finishing so I had mine finished with bias tape borders. I made mine from some IKEA fabric.

For the fun of it, I attached my DIY printed labels on the mat.


Knowing that my kids can’t tie a knot, i decided to use my snap buttons. the mat is rolled and secured with some twill tape and I pressed the snap button at the ends.


I made the pocket to keep the chalks and eraser with some scrap oilcloth and sew it to the bias tape so it can move out of the way so you get the maximum doodling space on the chalk mat.


I cut a kitchen sponge to half, one for Arwen and one for Danial and gave them a few sticks of chalks.


Prior to using the chalk mat, I read in many places that you should prime or cure it first by rubbing the side of the chalk and wipe it clean. 


It’s lots of fun to make and my kids are having lot of fun doodling on it. I think this is healthier in encouraging creativity in our children than handing them a PSP or an Ipad.


I’m definitely going to make some more of these and put it up for sale in my next bazaar.


Monday, January 16, 2012

One down, 11 more to go


My first bazaar for 2012. The location was quite secluded from the main area and the crowd was poor. There were a mix of vendors from clothing to sweet treats to jewelry and I think only SewFabby and Made by Rozi Rahman were the only handcraft goodies booth there. These photos were taken on the second day we’re there knowing that I would have time to take some photographs and play mamarazzi with my camera. I still have not found my niche yet on what actually move for my business so I’m still going to offer an array of items in the next few markets plus my stash of FQs and 1/2 yard cuts.

Below are some of SewFabby’s purses, clutches, bookmarks, keyfobs and ID tag holders that were put up on sale. We had notions too.


I would like to record my sincere gratitude to SewFabby’s blog followers and mine too. We appreciate the support and love you showed us by coming down to Berjaya Times Square and visiting our booth. 

And for the fun of having colours in this post, here’s some sweet treats that were also available during the bazaar. enjoy the pics :)


2012 is going to be a bazaar year for me. I hope to do one bazaar per month, hopefully. And on top of everything else, my love and endless gratitude to my supporting and loving husband and kids; He didn’t have much of a weekend taking care of the kids and my kids didn’t have much of a weekend without me around. What will I do without you guys? 

To SewFabby, I’m hope you’re set for the ride, partner.

Wednesday, January 11, 2012

A race against time for Manizer Bazaar Attack!


I’m joining forces with SewFabby and taking part in this bazaar. I’m having a mild panic attack now trying to get things ready for it. Here are a few things I’m going to put out for sale at the booth this weekend.

DSLR Camera Strap Cover @ RM27.00 a piece

Designer Cotton Baby Bibs @ RM14.90 each
Designer Cotton Pacifier Clips @ RM9.90 each. Add RM2.00 for personalization with alphabet beads

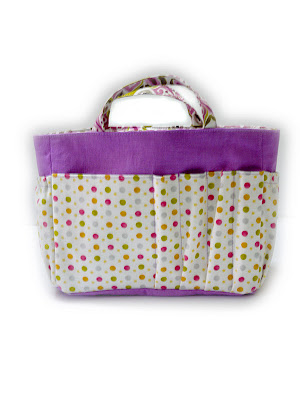
Handbag Organizer #1

Handbag Organizer #2
Came and show some love :)


Friday, January 6, 2012

I’ve been bitten by a tatting bug

It all started when somebody mentioned about tatting in my favorite group on Facebook and it brought back my childhood memories of watching one of my grand aunt tatting laces. So I googled up ‘tatting’ and watched a few youtube videos. I was confident enough that I could learn this on my own so one fine day, I dashed to Yee Button and got me some supplies.


After a few practise with the knots and picots and rings, I dare myself to try a simple pattern. This is a simple edging pattern which I didn’t complete because I didn’t know how to add new yarn when the shuttle ran out of yarn.


Knowing how to flip the thread with the crochet practise thread, I went up a notch and tried a proper crochet yarn. I was way over my head taking on a two shuttle pattern. I fumbled at joining the small ring to the large ring where they got twisted.


Then I tried this pattern called the blue motif because it’s simple enough. I like the result and if I stiffen it, it can be a nice christmas tree ornament or be an embellishment on Arwen’s dress.


The blue motif got me started on looking up simple floral design just so that I can finish a tatting project and maybe add it to my other sewing projects as an embellishment. In this 5 petal daisy pattern, I learned how to do double picots :) It sounds complicated than it seems :)


From that flower, I thought I could just make it into a pendant and tie a ribbon to it. So I looked up tatting patterns for jewellery. I found this 6 petal daisy as part of a choker or an earring. I like the simple design. More importantly, I managed to finished it, rather than it be a UFO (UnFinished Object)


My favorite reference is Jon Yusof of Tat A Renda. I learned how to add new thread without tying a knot and wanted to try one of her free patterned. I did this early this morning. I thought it turned out quite well only to be pointed out the error of an extra ring at the end by the pattern designer herself! I am very proud that she took notice of my work even though just to point out an error :) Thank you Kak Jon, you’ve been an inspiration.


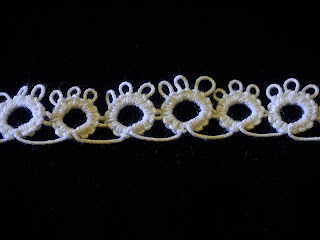
I have yet settled down to a routine with Danial in school these past few days. Arwen is at lost without her big brother to play with so she’s extra sensitive and extra clingy and cranky. I can’t get much sewing or any sewing done at to date. So, I settle with more tatting practise. I make this simple tatting edges thinking that it’s simple enough so I can have the length in no time but tatting is for the patient, and alhamdulillah, I have the patience for it. Perhaps I have the length for my own scarf.


So, I’ve kicked off my new year with a new craft to master and hopefully more bazaars to enter. The challenge is, to get things ready for the bazaar to sell. Not to mentioned the overdue projects that I’ve promised some friends. Hang in there, Erpha of Exclusive Smocking. I haven’t forgotten your diaper bag. You shall have it before you go into labour. That’s my promise :)


Nuffnang