Tuesday, January 10, 2017

Classes in January

I am working on my various layouts in my bullet journal and decided to take a snap shot of my January calendar and do a quick announcement on my social media for my classes.

I have been doing regular biweekly classes at Spotlight The Mines since last year. I have some regular knitters who come and knit and welcome new ones to join us. I also conduct basic sewing class. My classes run concurrently between 10.30-12.30. So, if you want to pick up a new hobby, why not try knitting with me? 

Another class that is happening this Saturday is Personalized T'shirt Workshop where I will be showing participants how to use the Silhouette cutter to cut heat transfer vinyl. There is still seats available if you are interested. Advanced booking is required as I need to get the t'shirts.


Thursday, January 5, 2017

Unboxing Dream Journal by Paperdorable

This is a long overdue video. I received a Dream Journal by Paperdorable with compliments from Helmi Razali from Paperdorable months ago last year. I didn’t want to use it mid year so I decided to keep it for 2017. I’m actually off to a sluggish start in the new year because my son was down with viral fever the past few days. He seems to have recovered slightly and decided to go to school today. Then only I can work on my unboxing video. 

I had a tough time setting up my camera for the video because the weather is gloomy outside and I don’t get enough light to come in.  This is my first time doing an unboxing video and I tell you A LOT of things happen behind the scene to make a decent video. I have a renewed respect and admiration to the crafters and artisans who does how to videos and the likes. 

I used imovie to edit and record my voice for the voiceover. At first I thought I could wing it by going off the cuff but I ended up with ummms and ermmmmsss that I ended with a simple text so I can read from it. Another renewed respect and admiration to life tv hosts and stand up comedians. I have but no choice but to stick to my day job.

Anyway, as mentioned in the video. I am super loving the Dream Journal from Paperdorable. It looks and feels so posh with the leather exterior cover and the gold hot stamping details. There’s also a pocket at the back of the journal which is a plus in my book. I opted for the Cherry Red journal and dotted pages. The other colour is Charcoal Black and other options for the pages are lined or gridded. I can’t wait to start journalling in this notebook. I plan to do a review video of the journal once I have my layouts done so stay tuned.  In the meanwhile, here is the video, enjoy!


p/s: Do check out Paperdorable website for more offers and beautiful selections of notebooks and planners.

Tuesday, January 3, 2017

First Day Of School 2017

Today is the first day of school and only little missy is going to school. Big brother runs a high temperature so I got him to take some medication and go back to bed. 

Here's our customary first day of school photo:
Everything except for her hijab, socks and shoes were from last year. I think we can stretch one more year out of that penifore. I made her hijab last night and finished 2 more today. 

I posted a quick video on how I finish her hijab with twin needles on instagram along with 3 tips. Check out my IG @madebyrozirahman to find out what the tips are.

The other new thing to school for little missy is her schoolbag. I promised her a new backpack this year as her old backpack was one she used since kindy. Incorporating all her favorite things: PINK, FROZEN and GLITTER, i wrestled up this bag on my Brother NV900. 


The pink material is denim. I used flexfoam from Legacy Creation to line the back and the base of the bag. Love how it holds the structure of the bag. Elsa image was printed on a printable heat transfer material and Arwen's name is cut from glitter heat transfer vinyl. 

I took the path less travelled and added corded binding to the bag. Love how it turned out. 

So how was the first day of school turned out for you?


Phone Pillow Tutorial


I made this phone rest aka phone pillow for a bazaar recently. However the sale was not so hot so I had a lot of ready made stocks. Luckily, my cousin bought the whole lot plus some more as gifts. That's my new year egg breaker. In case you are wondering, when I was in sales many years ago, my boss refers to the number zero as an egg. So, when any of our salesteam brings in the first sale, it means we've broken the egg, get it? Nevermind...

Anyway, since I have to make a few more to make up the order, I decided to take some photos and do a tutorial. This also serves as my reference source as I am really bad at keeping physical notes. OK, here goes:

Cut a rectangular piece measuring 8.5" by 6"

Fold the fabric together and sew a line down the short side (6" side) with a quarter inch seam.

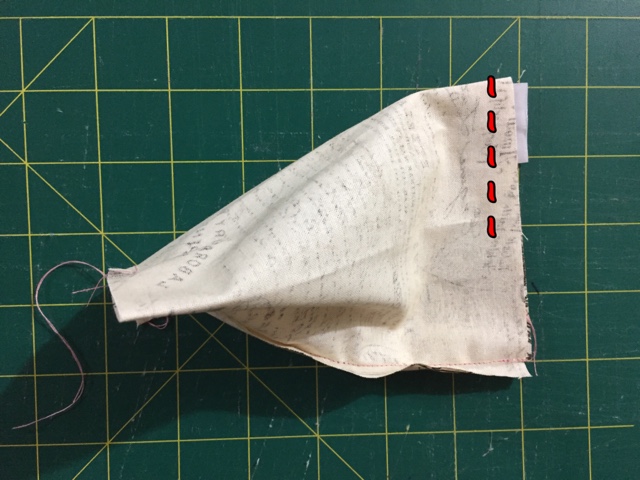
Finger press the seam open. Position it so that the seam is in the centre and sew another stitch line on one side and leave an opening to turn later.

Turn your work onto the other side and now position the first seam line at the bottom and stitch pependicular to it leaving an opening to stuff it later.

Turn your work right side out and poke out all the corners. With the first seam facing down on the cutting mat, mark 1" and 1.5" from the edge and sew 2 parallel lines on ghat marking.

Stuff the 1" shell with fiber fill and hand stitch it close.

Stuff the other end of the shell and you will see how the piramid is taking shape. I add a few spoonfuls of fine pebbles for some weight. By the way, isn't the multicolour grain cute? Hand stitch the opening close and there you have it! Easy peasy lemon squeezy. 


I hope the instructions and pictures are clear enough. Do tag me on instagram (@madebyrozirahman) if you do make one following my tutorial. Good luck!

Nuffnang