Saturday, October 29, 2011

Gearing up for my first Craft Market


I’m excited over the craft market that’s happening tomorrow that I can’t go to sleep. I might as well blog about it and spread the words. Azzah of Sew Fabby has graciously open her booth for fellow GMJ to put up their items for sale and I took up the offer. So, Rozi’s Needlework or Made by Rozi Rahman (I’m rebranding) will have our first craft market exposure tomorrow in Booth 17. Do come and check it out.

I have a few things that I’m putting for sale and they are:

Luggage tags @ RM12.00 a piece
Passport Covers @ RM15.00 each

CD Toter @ RM50.00 each

I only got to make very few of these items so if you want them, grab them quick at the craft market. I’ve also dabbled into making my own price tags and again Azzah of Sew Fabby helped out with the purchasing of the plastic packaging.


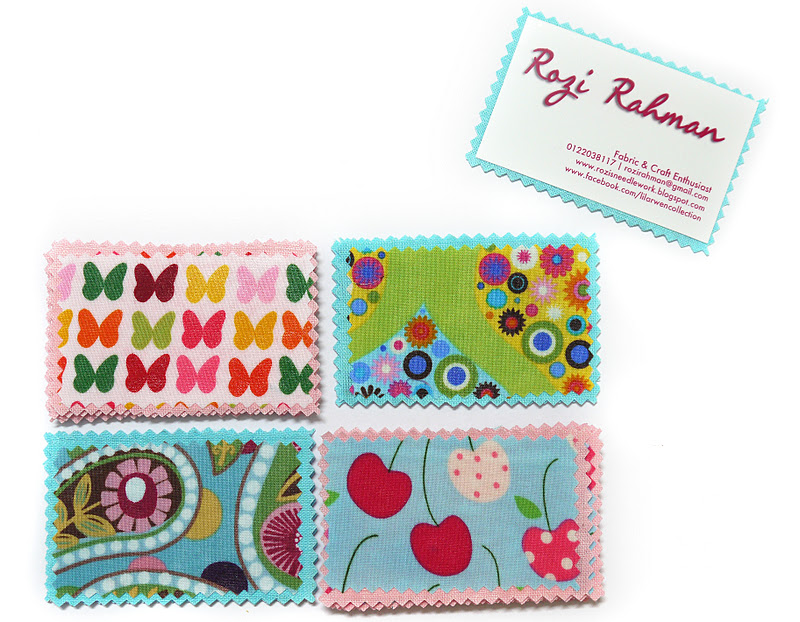
In the eleventh hour, I decided to make my own business cards. I got my inspiration from here and since I’m just looking for an excuse to use Mod Podge, this is a perfect project for it.  I started applying Mod Podge on some scrap linen for the base fabric and some cotton scraps for the deco fabric. I didn’t have card stock so I used whatever that’s available in the house; HP Photo paper. 

I love this project. The only one setback is I have to leave the Mod Podge to dry before the next step and I don’t really have the luxury of time. Yet, I managed to make quite a few of these beauties. I’m very proud of them especially the design on my card. I made it from scratch and threw it to my good buddies in GMJ Club. They comment, gave ideas, shared, improved until I have the final design. That’s why earlier on I mentioned I’m in the midst of rebranding. I’m pushing my name as a brand. 

And here’s some of the fabrics designs that I used for my card. And this is the first batch. The second batch is still left to dry for the night. 


These will meet the public at the craft market tomorrow. I better get some sleep. Need to wake up early and drive to PJ to help set up with the booth :) 


Monday, October 24, 2011

My First Mod Podge Project - Fabric Fridge Magnets!


I went on a Mod Podge hunt yesterday and got a few 4oz bottles from Craft Haven in One Utama. I’ve been itching to make these fridge magnets after I saw some scrap busting ideas in Make It & Love It blog. Mai of Okinokiyo mentioned that she got her Fabric Mod Podge from Art Friends in Gardens. Here’s her post about her Mod Podge project. I called up both places and both of them didn’t have Fabric Mod Podge anymore. I resorted to the general purpose Mod Podge and made this this morning. Super easy, super cute! Now I need more of these fridge magnets to recycle! Oh, and the how to is here.

This is one blog with lots of projects with Mod Podge: http://www.modpodgerocksblog.com/

Here’a youtube video on making a frame with fabric Mod Podge:


The possibilities with Mod Podge is endless!

I’m pretty sure I’ll going through my 4oz bottle in no time. Simply loving it!


Saturday, October 22, 2011

So many things to tell


A quick update. I made these beauties for Siti Hajjar, proud owner of Smokin’ Salma. She gave me October 14 as a deadline but at the same time invited us for Smokin’ Salma’s 1st anniversary on October 10, 2011. Since I’m already set to see her that monday, I rushed these handbag organizers and made all three in one day! That’s a personal record created!

Notice how my pictures are now seamless with the background. I’ve always wanted to do this and finally managed to do so just recently. Sheila of Nice Craft by Sheila Wahid gave a link in my favorite group on facebook, GMJ Club on how Jaja Craft editted her pictures in her blog; JajaKraft. I tried and tweaked it in my Photoshop. I checked out other tutorials on YouTube too and learned how to use the dodge tool. It worked out ok but the amount of time I spent to edit the pictures made me search for an easier solution. Then, Yatie Manan gave me the answer. She shared with me how she edited her pictures by using the Polygonal Lasso Tool to crop her pictures and layer it on a white background and add shadows to it. I tried it and simply love it! Now I can even touch up the pictures with the dodge tool. My eternal thanks to those who generously share their tips on how to edit pictures. 


OK, Back to my craft story. I made a few of these camera bag inserts too. Made adjustments on the steps to finish the inserts. I prefer to call it a camera cube. I like the neater finishing on the top edge compared to the top stitching I did on mine but this means I have to struggle and wrestle the foam through a small opening compared to the initial process. Still, that’s a small price to pay for the end result.


Last Sunday, October 16; I went to  GMJ Gathering in Shah Alam. It was a blast! Having a bunch of ladies with common interest under one roof. Even though it’s the first real life meeting for most of us, but we bond almost immediately. We instantly connect and talking and sharing like old friends. Crafting and sewing bridge the gap between us. It was a great fun. What was supposed to end at 12pm, lasted till much-much later for some of us (you ladies know who you are :)) Thank you Sheila for car pooling. 


And this is a picture of me with Jueleha Sakiman; my asrama mate. We were in Asrama Puteri Seremban. She went to Convent and I KGV. Imagine how cool it is for us to meet after 20 years. She’s still the same ever. Unlike me, I’ve expanded exponentially :P


Wednesday, October 19; I got these stuff I ordered on amazon.com. I actually just wanted the Micro four thirds puffer from Gary Fong but since I’m shopping, I added a snap pliers kit, eyelet pliers and printable fabric sheets. For the love of me, I have no idea what I’d do with them yet but I know when the time comes, all these will come in handy. 


Last night, I scrap busted and made these luggage tags to sell at Azzah’s booth in Etsy’s Craft Market this coming October 29 in JayaOne. Again, this is the birth of a combination of ideas. Below is the version 1.0 with the fabric strap. For the new version 1.1, I used elastic band for the strap. Yatie Manan, the tutorial diva in GMJ Club shared a link on scrap busting and I saw and adapted the elastic band idea to my luggage tag. This is the magic of putting your heads together with like-minded people; creativity mode grows exponentially too :)


More on the craft market, check out Azzah’s post in her blog here.  I better start cracking on my Saturday; Fabric hunting, birthday present shopping, birthday party and more items to make for the craft market. Have a great weekend folks!

Friday, October 7, 2011

Baby Quilt in progress and a few quickie projects

Ever since I got my Lumix GF1 (and later GF2), I vow that I would not post any camera phone pictures in my blog but I’m going to make an exception today because the whole lot of my photos today came from my iphone. Call it, “In honour of Steve Jobs (1955-2011)”. It just crossed my mind that he died at the same age as my dad, at 56. Great men... Well, Rest In Peace Steve Jobs.

On with my story. It’s been a while since I last made a baby quilt. Too long. I promised my cousin that I made her one when she gets a baby. The baby is now 6 months old. I need to get cracking on that quilt. So, last Wednesday, I got to make some sketches, chosed some fabric and piece together some blocks to make this in one morning! How cool is that? The piecing together of the blocks and sash is the easy part. The tough part of quilting the quilt is yet to come.


Then, I got sidetracked when the admin of a craft group that I joined suggested a toy/doll sewalong. I knew there would be hundreds of dolls/toys tutorial on the internet and I googled “Angry birds tutorial”, thinking that it’s a chance in a million that someone would share a tutorial on those cute birds. I was proven wrong when I came across Obsessively Stitching blog. She has the whole Angry birds jingbang plushies made. Here’s the link to her: Obsessively Stitching: Angry Birds Plush!

Angry Birds Plush from Obsessively Stitching
I wanted to make one really bad and needed to get some fleece for the birds. Plus, I need to get the backing for my baby quilt anyway so I drove over to Kamdar IOI Mall to get some fleece. I only bought a red fleece and substituted the other colours with flannel.


Here’s my shopping assistant window shopping at Toys ‘r’ Us (which is right next to Kamdar) after being good while mama gets her stuff. 

She’s so into fashion!
A quick photo shoot


Little Diva
It was raining when we wanted to get back to the car. So I pulled out the red fleece and cover Arwen with it. She liked it so much that I let her use it as a blanket to keep from the air cond in the car. 


Arwen dozed off under the blanket

We got back in time to fetch Danial from school. Danial saw an opportunity to use his raincoat so I let him. The rain was about to stop and it wasn’t raining so hard as it had earlier. I thought, why not? I used to love playing in the rain as a kid.


I didn’t waste time and got to making my own Angry bird plush the next day. The tutorial is very easy to follow and here’s the result: I think I should have put some fiber fill into the top feather as well. 


Arwen fell in love with it the moment she woke up.


Since she loved the fleece so much, I decided to make her a blanket. I saw a patchwork border wool blanket in Weekend Sewing by Heather Ross. It’s a good way to use up my scrap fabric. While attaching the border to the fleece material, I recalled the idea of a quillow. I made a quick search and found this on youtube: 


Since it’s not exactly a quillow, I’m dubbing it as a BLANKOW which is a combination of a blanket and a pillow. Here’s some photos of my BLANKOW:

A for Arwen Blankow in pillow form

Blankow in blanket form

The layout of the BLANKOW

Reverse side of the BLANKOW, you can see the pocket stitching. The opening is towards the centre of the BLANKOW


The Blankow all folded up and ready to go. I think it’s a neat gift for a baby shower and practical too. You can keep it in the car or bring it in a stroller with the baby. Now, I have to make one for Danial too, otherwise he’ll sulk.


Tuesday, October 4, 2011

When I’m in the mood-everything move smoothly


I received a few enquiries for handbag organizers a few weeks ago and recently finalized the choice of fabric, design and payment with the customers. The first one is my design made with Lovely by Sandy Gervais and a matching turqoise linen. I love the combination. I made this from scratch in one day after the client confirmed and transferred payment to my account. As standard procedure, I usually ask for 2-3 weeks grace period to make an item but since I’m in the mood for some sewing, things run smoothly. Even if I have to rip some seams, I take it in my stride. It’s part of the process :) How Z.E.N. is that?


I made another version of a handbag organizer which only has pockets and dividers inside to fit into a small handbag. This organizer is approximately 8.5”(L) x 4.5”(H) x 3” (D). My clients sent me a draft of how she wanted the organizer to be and the measurements. I have to figure out how to make the dividers and other compartments. It turned out quite neat too. I like this and will put it in the Product and Pricing page soon.

Then, another client asked for a passport holder that holds four passport. She asked for a combo that’s no longer available but I managed to salvage a few scraps and put together this passport holder for her. She wanted the names of her family members embroidered on it. I chose green thread. I hope she approves. This holder measures approximately 8” (H) x 9”(L) when opened and 8”(H) x 4.5” (L) when closed. It’s the first, I may want to tweak the design a bit more and perhaps add a closure as it did become a little bulky when all four passports went inside. I made this today. Again, everything went smoothly till the very end on the last name, half way, the machine stopped and the warning came out “bobbin thread is empty”. *sigh* I took a deep breath, unhook the hoop and replace the bobbin. Part of the process, part of the process... I keep telling myself :)


And oh, by the way, I made another Ilisa Back-Tie Bow Dress with some cotton fabric from a local textile shop (Kamdar) for a cousin who’s giving it to her grand-niece. She asked me to make one for her grand-niece quite a while back but I didn’t get around to doing it until recently. Part of the reason was I wanted to send her some clothpads so I figure I might as well stitch up a dress quickly and send them together. The Ilisa dress is so simple to make that I’m addicted to it. It was just another reason to make one :)

I think one of the reason I’m on a high key is from the support and encouragement of a few craft groups on Facebook; namely GMJ Club and Program 1H1P. I’m excited to share my interest and what knowledge I have in photography with the members as I believe in decent pictures for your blogs and online shops. No more pictures taken from handphone cameras. I shared a simple tip of making a DIY diffuser because a lot of them shy away from shooting with a flash. I showed them my DIY polystyrene cup and gave them links to make a DIY diffuser with a polystyrene plate

My GF2 with a DIY polystyrene cup diffuser. This picture was taken with Iphone
This is an example of a polystyrene plate DIY diffuser I found on the internet

Maybe I’ll do one blog entry for that later. :)  

Nuffnang