Showing posts with label scrap-busting. Show all posts

Friday, April 1, 2016

Crochet projects for yarn scrap busting

After the Knitting Party at Spotlight Mines (blogged about it here), I took the chance to sort out my yarn stash. As usual, I browsed Pinterest to get some ideas of things I can do to scrap bust my yarn stash. Here are some of the things I did with my scrap yarn:

Crocheted Tissue Roll Cover:
Great if you have an odd ball of yarn that you don’t know what to do with or in other words, a one ball project. I took out the cardboard core from the tissue roll so that I can pull the tissue from the centre. 


Crocheted Coin Pouch

I’ve unearthed my sharp crochet hook and made some coin pouches by crocheting directly onto the zip. 


Crocheted bath poufs

I made these bath poufs with cotton blend yarn. However, I don’t quite like it as when I used it in the shower, it doesn’t lather nicely when you squeeze shower gel onto it. I might do another bath pouf with different yarn. Acrylic yarn perhaps. I read up somewhere that it lather better than the cotton ones.

Monday, November 5, 2012

Tutorial: How to attach jumbo ricrac perfectly, every time

It's been ages since I last post a tutorial. So I thought I'd do a simple one on how to attach ric-rac, in my case onto a kitchen towel. I've been married for 10 years now and I'm lucky to have everything in the house ready at my disposal. I practically moved into our home with just a luggage. I never did buy a single kitchen towel ever since we got married so after 10 years, you would imagine that any kitchen towel in my possession looks more like a rag cloth than anything else. So I decided to make some new ones using some face towels that I found at IKEA for RM1.50 a piece.

So, back to my tutorial, the items that you need for a kitchen towel is:
1. 1 IKEA face towel (size: 30cm by 50cm or 12inches by 19 inches)
2. Cotton strip. I made mine 13inches by 4.5inches
3. Jumbo ric-rac. I use the 5/8inch wide


 On the right side of the cotton strip, pin the ric-rac along the long side; matching the bottom of the curve along with the bottom of the fabric.
Stitch over the ric-rac; I use my foot as a guide which is about 1/4inch from the edge and just about right in the centre of the ric-rac. Do it on both the long edge of the fabric.
Once you've attach the ric-rac as mentioned above, just turn the ric-rac over along the stitch line and TADAAA!!! there you have it, a perfectly even ric-rac edging. Just finger press it so it stays in place of if you really have to, run a low heat iron over the fabric. The ric-rac is made of polyester so it doesn't withstand high heat as cotton does.
 This is how it looks like on the other side.
 Place the cotton strip on the towel, perhaps 1to 2 inches from the edge, make sure you have cut your fabric to include the seam allowance on both ends. I made mine an extra 1" long so i can fold in 1/2in seam. Pin it in place like so.
 Stitch as close as you can at the edge of the fabric all round.
TADAA!!! there you have it. A pretty kitchen towel to brighten up any kitchen.
Don't just make one, make a bunch of it. A great way to use up all the scraps. A perfect house-warming gift and you can make some for Christmas sock filler.


Wednesday, March 14, 2012

An overdue post on Bazaar, Bazaar and Bazaar and a Gathering of Beautiful Women

I had the most hectic 3 weeks from my last blog post (17 February) to last weekend. The first, was my solo appearance at Little Red Market on 25th February 2012; my second bazaar for the year. The following week, I had another bazaar at JayaOne on 3rd March 2012 (bazaar #3) and Subang Parade on 4th March 2012 (bazaar #4). The following week after that, I had a gathering of my crafters' group on Facebook. So, here’s the breakdown of the series of events:

Bazaar #2: Little Red Market (25th February 2012)

It took place at one of the organizer’s residence in Jalan Beka, Bukit Damansara. Beautiful home turned into a quaint crafts market. I really have to go solo for this as the event clashed with Danial’s sports day. Azrai took care of the kids after helping me load my wares into the car. I’m on my own. Anxious and sweaty. I was really pleasantly surprised by the professional and warm conduct of the organizers, Melissa and Sally. They made me feel welcomed from the moment go and throughout the market hours.  Time flew as I was having a good time at the market :) Lots of beautiful items on sale on that day too and lots of visitors stopping at my booth and exchanged pleasantries. Here’s a write up at Little Red Market’s blog.

I didn’t have my camera with me that day as I gave it to Azrai to take pictures of Danial on his sports day. But here’s a great pool of pictures during the market day in Flickr:


Created with flickr slideshow.


Bazaar #3: Crafty Market at JayaOne (3rd March 2012)


After Little Red Market, I had only a week to replenish my items for Crafty Market. I didn’t make many as I was banking on selling my FQs and half yard bundles and some craft notions. This time around we, the craft vendors were dispersed among the other vendors throughout the markets. It has its pros and cons. More traffic no doubt but the question is whether is the right people stopping by our craft booth. I missed the old airy setup that we have on the lower ground near the water feature and the camaraderie of fellow crafters. It did feel a bit isolated.  Here’s a slideshow of the day. I took a few pictures of our booth (Sew Fabby and Made by Rozi Rahman) and got a photographer friend to go crazy with my camera.


Created with flickr slideshow.


Bazaar #4: I Love Bazaar at Subang Parade (4th March 2012)


The sale at Crafty Market went surprisingly well that I had to go back and make more items for the bazaar the next day. In less than 5 hours, I made 4 Multi purpose pouches, 3 diaper keepers and 4 girl colour baby bibs. Our booth was at the end of the world near Celebrity Fitness. It’s not just the location, but the crowd was generally slow that day. Business that day was like watching wet paint on the wall  dry. I guess you can’t expect to have a great bazaar every time. There’s bound to be some lousy ones along the journey. It just adds flavor to life. Here’s some photos:


The Gathering of Beautiful Women


I just managed to catch up my breath before preparing some lucky draw gift for a get together among my craft friends in a group on Facebook. I made 3 sets coasters (a set of 4) out of MDF boards found in Daiso and some scrap fabric and Mod Podge.


We had a great time. Took home a lot of lucky draw gifts not to mention yummy and cute doorgifts too. Friendship fostered on Facebook came to life and it’s like meeting with old buddies :) One of the best moments was when the main organizer won a grand item as a token of appreciation for her effort to put things together so that the gathering could take place. Here’s another slide show of the event that took place:


Created with flickr slideshow.

Thursday, February 9, 2012

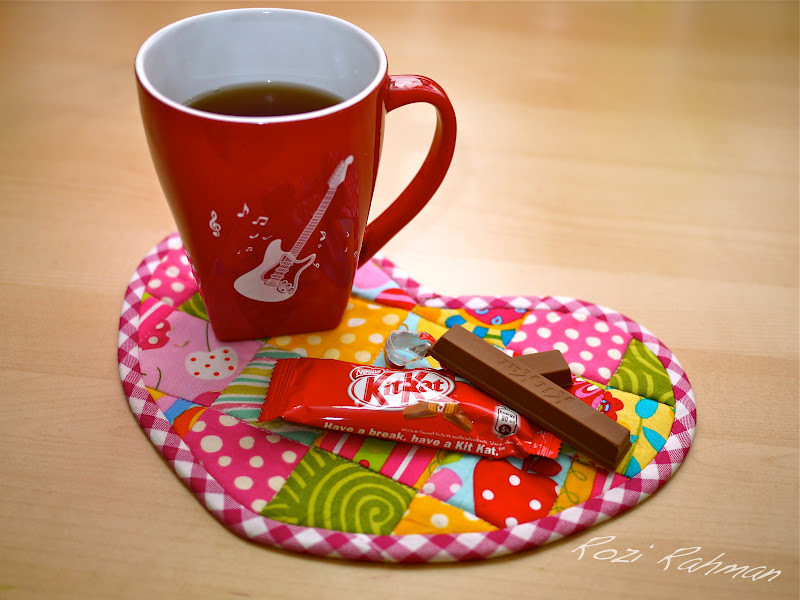
Scrappy Heart Mug Rug and a bit about photography


I made this scrappy heart mug rug last night. I love my scraps too much to throw them away and keep even the smallest piece that they got out of control. So in attempt to tame my unruly scraps, I made this quick scrap busting project last night and made another one this morning. It’s super fast. The blocks are 2.25” squares with 0.25” seam allowance. The mug rug finished approximately 9” wide by 7” height. 


Recently, in one of my Facebook craft group, there was a discussion about how a good photo makes an impact especially for online craft business. Needless to say, it’s the only form of communication to the potential buyers other than what other information that you provide in text form. 

I for one, pay a great deal for my photos. I’ve come a long way from photos taken from my handphone and uploaded here (yes, this same blog) to my current pictures. I learned a lot too. I love reading from blogs with great pictures, namely, lbg studio, Randomness by Petchy, Made by Rae, Made, and lots more. When i started blogging, I admired Maya and Zura Lovemelots for their photos, not just their crafts. I get inspired to make my pictures as good as theirs. Here are of my how tos on taking pictures:

Gone were the days that I took one shot and expect it to be a perfect shot. I took several shots at different angles. Don’t worry about shutter count. Most of us are using digital cameras now so, if you don’t like a shot, you can just delete it later. Here are some of my shots before I get to my favorite shot:

First shot: no flash. It was early in the morning. The sun is not out yet. The source of light is the florescent light on the opposite wall. 

With flash on. Too harsh

I tilted the flash on my GF2 so it bounced off the wall to create a warmer, more natural tone. 

Post editing is optional. Minor touch ups to straighten the picture, enhanced contrast, saturation, highlights and reduced shadows. I did this all in Iphoto. No fancy software. I only used Photoshop Elements 9.0 to add my watermark. I used to spend hours on editing alone but I’ve mellowed and followed my brother’s words of advice, ‘Simply photography, not simply photoshop’. Less is more.

I do believe post-editing is important. It’s like make up. You can do without but you’d look much better with a touch of lipgloss and some powder on your nose, don’t you agree?

My tips:
1. go for natural light as much as possible but if you can’t get any, don’t fret. work within your limitations. I shoot at all hours of the day, day or night. I work with artificial light. Don’t get intimidated with flash. Make it your friend. Work with it. Learn how to handle it, Bounce it off the wall or diffuse it. 

2. Composition and angle. I believe this is a learned art. You don’t have to be gifted to be able to take reasonable nice photos. Have fun with it. Experiment from different angles, different perspective. Don’t just take straight shots. You might be pleasantly surprised to see the results. Add props and different backgrounds to highlight your product. 

3. Post Editing. I think I’ve covered that.

4. It’s a learning process. Practice makes perfect. Keep on learning. Take out your camera and take pictures. Lots of them. Learn about your camera and what it can do. Don’t just go on Auto mode.

I’m in the mood for more of these mug rugs. I might just add a tutorial for it. Till then, take a break, have a KitKat  :) 


Saturday, December 10, 2011

Let the pictures do the talking

I bought some jute twine from Daiso recently and tried to knit it into a basket. This is my WIP:


Some times earlier this week, I sidetracked and made scrappy keychains. I found a tutorial here and made my own versions. I like the circle ones but my circles didn’t come quite as cute as I wanted them to be so I stick to squares and rectangles. 

My first prototype

The approved version

This is me going overboard!

I also bathe my cutting mat for the first time upon reading that my OLFA mat loves moisture. Here’s the link. It’s not my say so. I don’t have a bath tub but I managed just the same. It’s true, My mat loves it. It does feel more supple :) Try it yourself. 


I’m clearing up my stuff too (in my never ending to bring order in my sewing room) and decided to sell off my old fixed circular needles and straight needles. As to this point, my circular needles are all sold off and I have a few more straight needles selling at RM8.00 a pair. 


I’m letting go of my older needles as I’m making room for my new KnitPro Symfonie Interchangeable Deluxe set :)

And I made two version of Avabags using laminated fabric that I bought from IKEA. The one in front is the original version with cotton webbing handles. I padded the lining with 160gm fiber batting. It gives the bag a nice shape. The one at the back is more of a tote size Avabag which I increased 30% from the original template. I made the handles longer. Loving both of them. You can see them making their debut at the next craft market at JayaONE, this coming Saturday, 17 December 2011.


We are going to attend a wedding reception the evening of 17 December 2011. It’s my brother inlaw’s wedding recaption and the theme colour is grey. I decided to knit Arwen a top because I have some leftover Rowan Milk Cotton in Humbug. I used the pattern: Eastern Promises from the magazine Get Knitted which I recently bought at RM19.90. It has 70 patterns. What a deal. This project was super fast. I made it in 24 hours!


Here’s Arwen modeling it for me with the help of Danial with his bubble gun. I planned to have it paired with a puffy skirt. I’m making a short sleeve shirt for Danial with the same material. The only problem is I don’t have anything to wear.


 I finally got my business cards printed professionally by a fellow facebooker who owns a printing company. It’s a great deal. RM33 for 3 boxes. The best deal in the whole of Klang Valley! Fast service too. I got it in a week after confirming the design and made the payment. Thanks Kak Zamara Buang of RedBlack Art Studio.


I made my card plain because I wanted to personalize it with my scraps. Tested and I’m quite happy with my ver 2.0 of fabric bizcard. The ver 1.0 is here.


And I still have loads to do.... 


Monday, October 24, 2011

My First Mod Podge Project - Fabric Fridge Magnets!


I went on a Mod Podge hunt yesterday and got a few 4oz bottles from Craft Haven in One Utama. I’ve been itching to make these fridge magnets after I saw some scrap busting ideas in Make It & Love It blog. Mai of Okinokiyo mentioned that she got her Fabric Mod Podge from Art Friends in Gardens. Here’s her post about her Mod Podge project. I called up both places and both of them didn’t have Fabric Mod Podge anymore. I resorted to the general purpose Mod Podge and made this this morning. Super easy, super cute! Now I need more of these fridge magnets to recycle! Oh, and the how to is here.

This is one blog with lots of projects with Mod Podge: http://www.modpodgerocksblog.com/

Here’a youtube video on making a frame with fabric Mod Podge:


The possibilities with Mod Podge is endless!

I’m pretty sure I’ll going through my 4oz bottle in no time. Simply loving it!


Nuffnang