It’s the time of the month again and I ran out of cloth pads. First, I was surprised but then I recalled that I gave a couple to my mom when she had a diarrhea episode on Hari Raya and didn’t want any unpleasant “accident" while we’re out visiting. She wasn’t happy that I gave her cloth pads because she wanted something that’s disposable so that in the event an ‘accident’ ever did occur, she can just throw it away. I have been using cloth pads for a while now that I don’t have any disposable pads lying around the house to spare her some. I just told her, she can throw them away if she wants. It’s not easy to educate people the practicality and economical attributes of using reusable material. People tend to think it’s old-fashion.
Anyway, my first three days are usually the heaviest. I usually stack two cloth pads together (and that’s another reason why I ran out of them so fast). I noticed that I usually ‘leak’ at the back and at the wing so this time around I constructed a pattern that’s extra long and extra wide at the bottom end. I thought the reference material here is very informative and useful.
Here’s my how-to or tutorial if I can call it one.
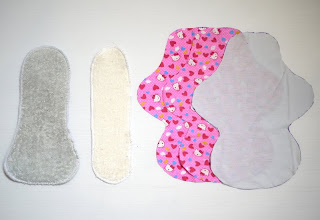
Soaker-terry cloth from an old towel. The left most is two layers of terry serged together. Next to it is another towel (of a different colour) also as a soaker.
Flannel for the core and backing and cotton knit from an old t’shirt.
Pin the broad bottom soaker to one of the flannel. This will be the core piece. Notice that the soaker is smaller than the flannel by about 0.5”. It doesn’t matter whether you put the soaker on the right side or wrong side of the flannel. It’s going to be sandwiched in anyway.
Run a zig-zag stitch around the soaker.
Place the straight soaker on top of the first soaker and zig-zag stitch around it’s perimeter. Again, the second soaker is narrower than the first one.
Now layer the pieces: Flannel (bottom) right side up, cotton knit from the old t’shirt (this is the piece that is next to our skin), core piece.
(Note: you can add a layer of PUL if you wish to waterproof it)
Pin them together. a straight stitch around it.
I used a 1/4” seam allowance, catching all the three layers.
DON’T FORGET! to leave an opening to turn the cloth pad.
Edge stitch around the border to close the opening.
Attach snaps on the wings.
Go ahead an look around for a pattern that is suitable for you. Just google for ‘cloth pads tutorial’ and you’ll be spoilt for choice. Make some and use them. It’s not that big a hassle to clean and wash them. Good luck!


Asm Cousin Rozi, I am a CP user since 2 'periods' ago. I agree, it is safe and economical but it takes time to getting used to cleaning after wards. I bought mine from FB. How much is yours? I need some more. -Cousin Jaslin.D
ReplyDeleteWalaikumussalam Cuzzin Elaine :) My CPs are for personal use only. I’ll send some your way :) InsyaAllah :)
ReplyDeleteThanks...so sweet of you.
ReplyDeleteas'salam,
ReplyDeletekat mana bole sy dapatkan snap button mcm ni yer... bole emel ke sy x? fyda97@gmail.com
thank you