Friday, September 30, 2011

Camera Bag Insert ver 1.0


I can now checked camera bag insert off my “to make” list. I made one this morning while Arwen is asleep. There’s a great tutorial here but I winged my own measurements because my camera is a small GF2. The finished insert measures approximately 12”(L) x 6”(H) x 6”(D). I only used two thirds of it with two lenses in one compartment and the camera in the middle compartment. I guess this size might fit bigger DSLRs better. I used some scraps from my wall hanging organizer here.  It fits my Longchamp tote my brother gave me and it adds structure to my Cosmo bag. I will keep this in case we go travelling, I can use the extra compartment to keep the charger and a speedlight (when I have one). I might make a smaller version for everyday use. I still have heaps of the 1/2” foam left from the foam mat that I bought at a DIY store.

Loving it! 

Monday, September 26, 2011

Another Cosmo Bag-Resized


Isn’t this combination gorgeous? I just love it. It’s a resized cosmo bag for Eda Hashim. She ordered the original Cosmo Bag from me some time ago. This bag is made with Gypsy Paisley in White as the main exterior fabric matched with Zen Garden in Pear for the handles and trimmings. The lining is a pink checkered pattern Japanese cotton. I just love the whole ‘freshness’ look of this colours.

For more information on the bag, please check out my Products and Pricing page. I’ve already put it up there.


I added a key-ring strap so you can hook your keys to it and keep it from being lost in the bag. If it’s the house keys, you don’t have to unhook it from the keyring strap, I made the strap long enough so that you can just pull your keys out from the bag, unlock the door and chuck it back into the bag. 


Inside view of the bag. It has two side pockets and one zippered pocket. Enough to hold a lot of things, except the kitchen sink!

And this is my little assistant ‘helping’ me out during the photoshoot. Not the sharpest picture but still a priceless moment :)

Gift Idea: Ilisa Back-Tie Bow Dress For A Girl’s Gift


After I posted Ilisa Back-tie Bow Dress in Lil Arwen page in Facebook last monday, I received an enquiry from a friend asking if I have time to make one before friday. She’s attending a friend’s daughter kenduri aqiqah and wanted to bring a gift. Being the first order for this dress, I didn’t want to let her down and quickly make one in the combo she asked for. Knowing that it’s a gift, I packed it in a gift box and tie a pink ribbon on it. Head on to Lil Arwen’s page for more fabric combo for this dress.
I’m looking forward to make more of this cute number :)


Monday, September 19, 2011

Ilisa Back-Tie Bow Dress Open For Custom Order at Lil Arwen

I fell in love with the Reverse Knot Dress made by Zura Lovemelots when she first posted it in Lovemelots Creation page and I’ve been itching to make one. I made this prototype Back-tie Bow Dress today and named it after my youngest niece, Ilisa because the dress is simply adorable. I love making it so much that I decided to put it up for custom order at Lil Arwen. Please visit Lil Arwen for some combo suggestion for this cute little number.
I also made a peasant dress and used up my 1/2 yard Amy Schimler’s Staggered Hearts fabric. I matched it with Stripes in Spring from Animal Can Party Too! also by Amy Schimler. I’m going to put it up in Lil Arwen for custom order too. I decided to name it after Jasmyne; Jessica’s little girl after she asked me to make a dress for little Jasmyne and the first dress I made for her was a peasant dress.
This dress is very roomy for Arwen as I used up the whole 1/2 yard. Please don’t ask for this combo. I don’t have it anymore.

I’m quite pleased that I managed to finished 2 dresses today despite of the gloomy weather. The weather is perfect to snuggle on the sofa and just watch tv with Arwen. The fact that we received a piece of good news this morning is also a motivator for me. Danial has been accepted to Sri Ayesha Islamic Intergrated School in Bangi. What a nice birthday present for him. Yes, my little boy is turning 6 tomorrow. How time flies...

Wednesday, September 14, 2011

Heavy Flow Cloth Pads


It’s the time of the month again and I ran out of cloth pads. First, I was surprised but then I recalled that I gave a couple to my mom when she had a diarrhea episode on Hari Raya and didn’t want any unpleasant “accident" while we’re out visiting. She wasn’t happy that I gave her cloth pads because she wanted something that’s disposable so that in the event an ‘accident’ ever did occur, she can just throw it away. I have been using cloth pads for a while now that I don’t have any disposable pads lying around the house to spare her some. I just told her, she can throw them away if she wants. It’s not easy to educate people the practicality and economical attributes of using reusable material. People tend to think it’s old-fashion.  

Anyway, my first three days are usually the heaviest. I usually stack two cloth pads together (and that’s another reason why I ran out of them so fast). I noticed that I usually ‘leak’ at the back and at the wing so this time around I constructed a pattern that’s extra long and extra wide at the bottom end. I thought the reference material here is very informative and useful. 

Here’s my how-to or tutorial if I can call it one.

 These are the materials I use in the construction of my heavy flow cloth pads:

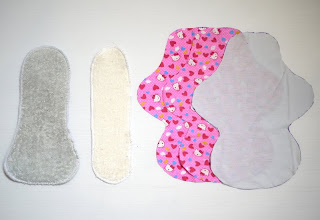
Soaker-terry cloth from an old towel. The left most is two layers of terry serged together. Next to it is another towel (of a different colour) also as a soaker.

Flannel for the core and backing and cotton knit from an old t’shirt.


 Pin the broad bottom soaker to one of the flannel. This will be the core piece. Notice that the soaker is smaller than the flannel by about 0.5”. It doesn’t matter whether you put the soaker on the right side or wrong side of the flannel. It’s going to be sandwiched in anyway.
 Run a zig-zag stitch around the soaker.
Place the straight soaker on top of the first soaker and zig-zag stitch around it’s perimeter. Again, the second soaker is narrower than the first one.
 Now layer the pieces: Flannel (bottom) right side up, cotton knit from the old t’shirt (this is the piece that is next to our skin), core piece.

(Note: you can add a layer of PUL if you wish to waterproof it)
Pin them together. a straight stitch around it.
 I used a 1/4” seam allowance, catching all the three layers.

 I run another zig-zag stitch around the seam allowance.
 DON’T FORGET! to leave an opening to turn the cloth pad.
Edge stitch around the border to close the opening.
Attach snaps on the wings.

There you have it.  My version of a heavy flow cloth pad.

Go ahead an look around for a pattern that is suitable for you. Just google for ‘cloth pads tutorial’ and you’ll be spoilt for choice. Make some and use them. It’s not that big a hassle to clean and wash them. Good luck!


Tuesday, September 13, 2011

A Quick Embroidery Job

My husband asked me if I could embroider the name of his company on his work shirts and I said, “Sure”. That was a month ago. He reminded me again last week and I thought I better get it done before he takes it to the professionals. Nothing fancy, just the name of the company. I used one of his worn out shirt made a few samples with different layouts and sizes of the fonts and he agreed on this one. You can see the water soluble stabilizer on the finished item.

For the fun of it, I’ll take you on a step by step process of this embroidery job. Why? 1. I’ve not updated my blog for awhile and 2. I just need to warm up my camera and snap some pictures and what good are the photos if they just stay in the harddisk? So here’s sharing some pictures with you all out there.

 I used two types of stabilizers;

1. the water soluble stabilizer. I found it after asking Mr. Yee of Yee Button and he ransacked his store and found me this. The roll is actually longer about 40” but a big chunk of it was spoilt (cockroach and lizards’ droppings) and Mr. Yee let me have the whole roll for a bargain price (I can’t recall how much). I took it home and saw off the rotten end and this is what I can salvaged.
 2. The paper stabilizer. Quite thick. I think this is from one of the projects from Epal.
 I cut just about enough to cover the work area and pin in to the shirt like this. this is the back view.
 This is the front view where I’ve marked the area where I want to embroider with water soluble marking pen and put the hoop on the shirt. Important note: the shirt is knit fabric so don’t stretch it when you attach the hoop. I did on my first trial and when I took off the hoop after the embroidery, the fonts got distorted and looked funny. Anyway, back to the story, again, I just cut enough stabilizer to cover the work area and pin it to the shirt.


 Then, set the machine. I use Brother N900. The machine is almost exclusively used for embroidery. I realized that I’ve misplaced the presser foot holder when I want to use it for normal sewing a few days ago. My other portable is acting up. The stitches kept jumping. Good thing the presser foot holder on the old portable fits this machine. At least I can still sew while getting a replacement.

After you’ve adjusted the size, placement, etc, just let sit back and let the machine run. When it’s done take the hoop off and trim the excess thread and stabilizer and there you have it!

OK, end of story. I’m off to make something more interesting.  That would be later. Now I have to give Arwen her bath. She’s been screaming bloody murder for the past half an hour!


Nuffnang